
У многих пользователей на ПК установлена прошивка-аналог традиционного БИОС. Данная прошивка обычно используется для программного обслуживания систем UEFI. При попытке установить на компьютер с такой прошивкой какую-либо версию ОС Windows пользователь может столкнуться с проблемами установки системы с внешнего флеш-накопителя. В нашей статье мы постараемся помочь таким пользователям и разберём, каким образом можно сделать загрузку с USB-носителя на InsydeH20 Setup Utility rev 5.0. А также что нам для этого понадобится.
Что такое InsydeH20 Setup Utility rev 5.0?
Как известно, прошивка с кодификацией « InsydeH20 » была создана американской компанией « Insyde Software ». Последняя специализируется на разработке и установке программного обеспечения для систем UEFI, а также на различных аппаратных решениях, преимущественно для компьютеров OEM и ODM.
Поскольку данная прошивка предназначен для систем UEFI, то бывает сложно установить на такие ПК операционную систему с флешки на основании архаичной технологии MBR. При попытке задействования последней пользователь часто встречается с защитой « Secure Boot », блокирующей установку новой ОС. Потому для установки нам понадобится не только отключить упомянутый «Secure Boot» в настройках БИОСа, но и задействовать режим совместимости, известный как « Legacy ». Давайте рассмотрим механизм реализации всего алгоритма пристальнее.
Каким образом сделать загрузку InsydeH20 с USB-носителя
Чтобы включить загрузку InsydeH20 с флешки, необходимо выполнить следующий комплекс операций:
- Войдите в BIOS вашего ПК. Обычно это делается быстрым клацаньем на клавишу Del (F2) при запуске ПК. При этом ряд компьютеров имеет другие комбинации для входа в БИОС (например, Fn+F2 на Lenovo);
- С помощью курсора перейдите в раздел «Security»;
- В данном разделе найдите опцию «Secure boot», и выставите её значение на «Disabled» (отключено);
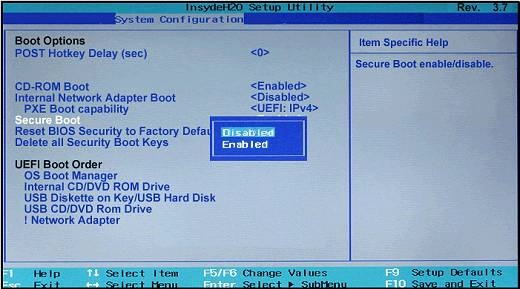 Для параметра «Security boot» выберите значение «Disabled»
- Теперь перейдите в раздел «Boot»;
- Здесь найдите опцию «Boot mode». Вместо стоящего там «UEFI» установите значение на « Legacy Support » (вместо указанного могут быть ещё значения «Launch CSM», «CMS OS», «CMS Boot», «UEFI and Legacy OS» и другие);
- В пункте ниже «Boot Priority» (при наличии) выставите значение « Legacy First ». При этом данный пункт может быть установлен системой автоматически;
- Теперь сохраните изменения, перейдя в раздел «Exit», и выбрав там опцию «Exit-Saving Changes» или просто нажав на F10;
- Ваш ПК будет перезагружен.
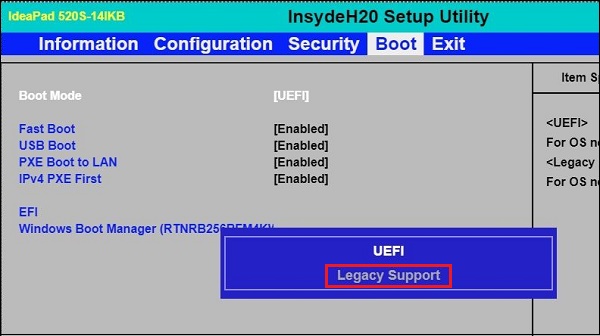 Выберите значение опции «Legacy Support»
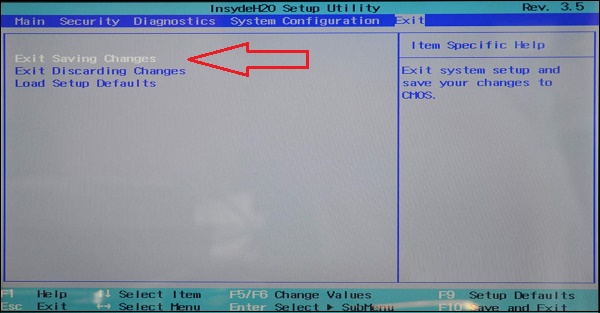 Сохраните произведённые изменения
Необходимые настройки для поддержки MBR сделаны. Остаётся поставить наш флеш-накопитель первым в списке загрузок. Тем самым осуществится возможность загрузки ПК с USB на основе InsydeH20 Setup Utility rev 5.0.
- Вставьте флешку в ЮСБ-разъём ПК;
- Вновь войдите в BIOS, нажав при загрузке F2 (или Fn+F2);
- С помощью курсора выберите раздел «Boot»;
- В пункте «USB HDD» выберите вашу флешку;
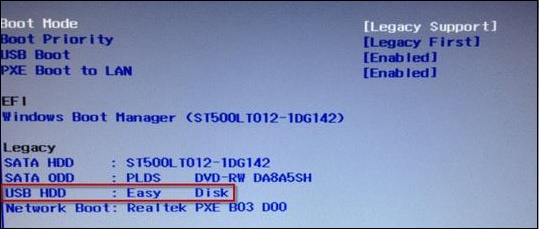 Выберите вашу флешку USB HDD
Передвиньте вашу флешку на первое место в списке загрузочных устройств (к примеру, с помощью комбинации Fn+F6);
 Поставьте вашу флешку первой в списке устройств
После выполнения данных операций вы сможете загрузить ваш ноутбук с ЮСБ в InsydeH20. При этом помните, что после прохождения первого этапа установки новой ОС Виндовс и соответствующей перезагрузке ПК необходимо отключить флешку от разъёма, иначе установка операционной системы может начаться заново.
Заключение
В нашем материале мы разобрали, каким образом можно сделать загрузку с USB-накопителя в InsydeH20 Setup Utility rev 5.0. А также каков регламент выполнения шагов данной операции. Если вы испытываете трудности при установке новой ОС с флешки на данном типе БИОСа, рекомендуем воспользоваться приведённой нами инструкцией.

| Posts: | 23 |
| Registered since: | 04.02.2019 |
I intend to share this useful tool which has low publicity so far. It’s a tool made by Insyde, citing from their pages:
H2OEZE™: Easy BIOS Editor that helps edit binaries in the BIOS, including Option ROMs, driver binaries, logos, and Setup values.
"The H2OEZE program is designed to provide interfacing functions that allow users to replace the content of BIOS or to modify the initial value in the BIOS. To perform these interface options, users must first load an FD file."
NOTE: Download attached as file to this topic.
Alternative mirror: dropbox DL (click)
*Edits .fd ROM files*
This tool allows you to conveniently replace and export;
– OpROM (including VGABIOS’es)
– Any module of choice (by GUID)
– Setup menu settings (CSV, example output: https://pastebin.com/ns9DjwQt
Module operations:
– Replace module
– Insert new module
– Delete existing module
– Export a module
OpRom operations:
– Replace OpROM
– Export OpROM
Other operations:
– Change BIOS version number
– Change product name
– Replace FV
– Setup Menu: update defaults, update strings
– Factory copy merge
– Generate logo FFS (EDK, EDK2)
– Replace logo
Microcode operations:
– Delete, append, add, replace, load, FlashMap (details), view header, details and content
Image of microcode tab:

Full documentation is included within the application’s GUI interface: Help menu at top > H20Eze Help.
Sample documentation (part about command line usage & syntax):
Command Line Interface
The H2OEZE application supports both GUI and Command Line. You can automate it with batch scripts or from other programs. All commands and parameters are specified with -command:parameter. You MUST use double quotes to encapsulate the parameter text with spaces.
Refer to the following table to get all the available commands and the following sections to know what these commands are for.
NOTE: application help table contains more detailed information about each command below. These are just summarised descriptions.
replogo
Specify the input bios image to do logo replacement
repmodule
Replace a module
insmodule
Insert a module
delmodule
Delete a module
repfv
Replace firmware volume
repoprom
Specify the input bios image to do Option ROM replacement
mergefc
Merge the Factory Copy data
genlogoffs
Generate a logo module
inslogo
Insert a logo module
repbiosver
Specify the input bios image to do bios version replacement
logopath
Specify the logo file path
logoindex
Specify the index of to-be-replaced target logo
logoconvert
Specify whether to keep original image’s dimension or to use new image’s dimension
fvpath
Specify the firmware volume file path
modulepath
Specify the module (DXE/ORG/PEI) file path
oprompath
Specify the Option ROM file path
opromindex
Specify the index of to-be-replaced target Option ROM
biosver
Specify the new bios version
guid
Specify the GUID
fcpath
Specify the Factory Copy file path
fvnum
Specify the number of firmware volume (zero-based)
out
Specify the bios image’s output file path
type
Specify the EDK type or version
delay
Specify the delay time after completely running the commands
-delmodule:Image1.fd -guid:35B898CA-B6A9-49CE-8C72-904735CC49B7 -out:DelImage1.fd
-repoprom:PD3X64.fd -oprompath:TS36461.020 -opromindex:1
-repfv:Image2.fd -fvpath:FVRECOVERY.fv -fvnum:2 -out:RepFvImage2.fd
Error Return Code
After a command is called, the following return code is available.
Return Code
Description
00h
Function completed successfully
01h
Load BIOS image failed
02h
Replace module failed
03h
Insert module failed
04h
Delete module failed
05h
Replace Micro code failed
06h
Append Micro code failed
07h
Delete Micro code failed
08h
Replace logo failed
09h
Replace Fv failed
0Ah
Replace OpROM failed
0Bh
Generate logo ffs file failed
0Ch
Merge factory copy failed
0Dh
Merge variable store and factory copy region failed
0Eh
Save bios image failed
0Fh
Replace bios version failed
*Note: version 100.00.02.13 is absolutely the latest available revision. I’m currently trying to get hold of an update from Insyde; if they provide me with one, I’ll add it.
Insyde H2OEZE Release Note
——————————————————————————–
Release Version 100.00.02.12 05-06-2015 (Kernel version required: 03.62.10, 03.72.10, 05.02.10 and later)
——————————————————————————–
Update:
1. Searching whole FFS to find the compressed section.
2. Add the missed feature "BIOS product name replacement" that 100.00.02.10 version provide.
3. Fix the padding is changed from 0x00 to 0xfe after modifying BIOS version and product name.
——————————————————————————–
Release Version 100.00.02.11 02-11-2015 (Kernel version required: 03.62.10, 03.72.10, 05.02.10 and later)
——————————————————————————–
Update:
1. Added the support of Tiano decompress
2. Remove SetupEditor from File menu
3. Change the copyright from 2014 to 2015
——————————————————————————–
Release Version 100.00.02.09 02-24-2014 (Kernel version required: 03.62.10, 03.72.10, 05.02.10 and later)
——————————————————————————–
BugFix:
1. Fixed issue that data may overflow when searching & verifying some kind of information
——————————————————————————–
Release Version 100.00.02.07 01-21-2014 (Kernel version required: 03.62.10, 03.72.10, 05.02.10 and later)
——————————————————————————–
Update:
1. Fixed ffs last section alignment issue – last section size must be its actual size instead of aligned size
2. Fixed replacing logo doesn’t work issue
3. Fixed ffs section alignment issue
4. Changed firmware image type search to walk through all firmware volumes till match found
5. Fixed issue 0028006:[EZH2O Win] The function of close can not clear the main screen for "Setup Utility Default"
6. Update firmware volume checksum after data changed
7. Enlarge firmware volume size if size isn’t enough when replacing module with larger one
——————————————————————————–
Release Version (SEG) 100.00.00.01 04-18-2013 (Kernel version required: 03.62.10, 03.72.10, 05.02.10 and later)
——————————————————————————–
NewFeature:
1. Merged changes of EzH2O version 2.1.0.25
2. Added new plugin dll to support security related features
3. Added preview user selected image file for logo replacement function
4. Added replace bios version function
——————————————————————————–
Release Version (SEG) 100.00.00.00 02-06-2013 (Kernel version required: 03.62.10, 03.72.10, 05.02.10 and later)
——————————————————————————–
NewFeature:
1. Merged changes of EzH2O version 2.1.0.23
2. Added support functions of setup variable edit utility
3. Change version to start from 100.00.00.00
NewFeature:
1. Added support the plugin feature
2. Added support -genlogoffs to generate logo ffs module
3. Added support -inslogo to insert a logo module
4. Added support to load CapsuleImage bin file, FlashPacker exe file (IsEzH2OPlugin.dll is required)
5. Added support to .EFI format for module replace function
BugFix:
1. ITS#19083: SCU "boot" item cannot work after the default value modified by EzH2O
2. Failed to load BayTrail fd image
BugFix:
1. ITS#18386: can’t replace FV00
2. ITS#18387: can’t modify default settings of SCU
——————————————————————————–
Release Version 2.1.0.21 03-22-2012
——————————————————————————–
NewFeature:
1. Add SCU String Update function (Support Kernel version Rev3.5B: 03.62.10, Rev3.7: 03.72.10, Rev5.0: 05.02.10)
2. Add Factory Copy Merge function (Support Kernel version 03.72.08 and later)
3. Support EDK2
——————————————————————————–
Release Version 2.1.0.20 01-04-2012
——————————————————————————–
1. Fix: Fix incorrect processing about Hii2.1 opcode=numeric.
2. Fix: Copy setup.css to temp folder.
3. Add new feature: Support expoorting Setup Menu Settings to CSV file.
4. Add new feature: export module and export oprom
5. Fix issue #16650: The EzH2O Ver2.1.0.19 always hang during load the FD file
6. Add new feature: logo image – support TGA format
——————————————————————————–
Release Version 2.1.0.19 07-11-2011
——————————————————————————–
1. Show a console windonw when running in command-line mode
2. Fix issue #12976: OpROM can’t be updated when there are two main firmware volume existing
3. BugFix: To replace a PEI module of bigger or smaller size will fail
4. Update the display format of "FD Information" dialog
——————————————————————————–
Release Version 2.1.0.18 11-26-2010
——————————————————————————–
1. Add new feature: command line support
2. Fix issue #11191: Delete and Add Microcode function are not working
3. Fix issue #11218: replace Fv02 with log enabled will result in tool crash
4. Fix issue #11217: it’s failed to insert USBKB module into Fv02
5. Fix issue #11223: it can’t show the modified logo by replacing a module generated from "generate logo ffs"
6. Fix issue #11216: progress bar not showing correctly when inserting module
7. Fix issue #11219: progress bar not showing correctly when replacing fv
8. Fix issue #11215: progress bar not showing correctly when replacing module
9. Fix issue #11214: progress bar not showing correctly when loading file
——————————————————————————–
Release Version 2.1.0.17 11-3-2010
——————————————————————————–
1. Add new feature to update SCU default settings in ROM
2. Update setup menu parsing policy (bios version 03.60.44 later for Hii0.9 and 03.70.44 later for Hii2.1)
3. Fix issue: "insert module" doesn’t work correctly
4. Fix issue: replace the same module, but get a different bios image
5. Update Help file
——————————————————————————–
Release Version 2.1.0.16 8-27-2010
——————————————————————————–
1. Fix issue #9976: can’t replace module
2. Fix issue that showing setup menu causes fail
3. Fix issue #9976: add functions to support PEI module replacement
4. Add features #10318: support Hii 2.1
5. Fix issue: can’t insert PEI module
6. Fix issue: can’t delete DXE/PEI module again after deleting and then inserting
7. Add checking mechanism to check if the insertion module is already existing
——————————————————————————–
Release Version 2.1.0.11 04-10-2009
——————————————————————————–
1.Added that generate logo .ffs file function.
2.Updated the "Module_GUID_2_Name.ini" user direction in HELP menu.
3.Added the "Attributed" to do the FV replace judgment.
4.Enabled the replace Microcode item and updated for 3.5B.(must update kernel version 03.59.16)
5.Enabled the Setup Menu item and modified for UEFIx64.(must update kernel version 03.59.16)
6.Added that display compiler version at Fd information.(must update kernel version 03.59.16)
7.Added that Log function to record execution.
——————————————————————————–
Release Version 2.1.0.9 12-29-2008
——————————————————————————–
1.Fix issue that change LOGO and save FD file,then reopen it fail.
2.Fix issue that loading LOGO image is failed , reopen change LOGO function will show wrong LOGO image.
3.Fix issue that file that has OEMDS uses change EC module cause OEMDS be replaced by ‘0xFF’.
4.Fix issue that module cause hang when user use the replace function.
5.Fix issue that the password of FV file become the GUID on Delete function.
——————————————————————————–
Release Version 2.1.0.6
——————————————————————————–
1.Fix using EZH2O open BIOS 1.5M *.fd file or some 1M *.fd file but it hang on open file.
2.Fix EzH2O help file that in [Modify a logo] page have show some "?" characters.
3.Fix the DmiStructure must entry "enter" key for modify strings.
4.Fix the EzH2O’s main process bar not right when patch DmiStructure.
5.Fix show user want save file after finishing save as file
6.Add checkbox in DMIStructure utility.
7.Add EC¡BPXE and External VGA utilities.
8.NEW Feature:Enhancement of EZH2O to show GUID and module name in [Delete Existing Module] function.
Агрегат Insyde H2O BIOS Utility практически пустой, даже потыкать некуда, нет вкладки power, а мне доступ с клавы нужен (
Обновил BIOS с f.03 до f.52 а поменялось только svm support на virtual technologes
Можно ли каким образом получить полный доступ к биосу?
вот тут http://www.youtube.com/watch?v=fqQ1sxvokxk есть видео по разблокировке расширенного меню в биос на аппарате Packard Bell TK83 Laptop..биос вроде твой. глянь.
Insyde H2O BIOS – новый EFI BIOS, который по сути представляет собой мини-ОС, со своими драйверами и программами. Одна из таких программ – BIOS SetupUtility, которая запускается после нажатия F2 во время загрузки. Особенность ее работы – это то что она использует т. н. формы для отображения пунктов настройки, подсказок, допустимых значений и т. д. Сами значения переменных (в данном случае настройки) хранятся в отдельной области – VSS. В отличие от BIOS SetupUtility эта область не сжата и доступна для непосредственного редактирования. В официальном файле прошивки область VSS пуста, поэтому он не может использоваться для редактирования настроек. Необходимо снять дамп своего биоса с помощью InsydeFlash, выше я писал как это сделать.
На этой странице можно найти более подробную информацию и инструменты, которые можно исползовать: http://marcansoft.com/blog/2009/06/e. -aspire-8930g/
Для начала нужно визуализировать формы SetupUtility, это позволит опредлить положение настроек в области VSS. Я использовал модифицированный файл main.py. Результат работы в текстовом виде для биоса 3810 v1.20: http://files.mail.ru/JNO0VF. Затем можно использовать скрипт vtenable.py (http://files.mail.ru/P2S3YX) для изменения значения конктретной переменной в области VSS. Например для включения интегрированной видеокарты нужно изменить байт по смещению 0x25a на 00.
В принципе зная абсолютное смещение переменной, ее можно изменить любым hex-редактором. Так переменная, задающая состояние переключаемой графики, находится в дампе биоса по адресу 0x18145a. 00 – только интел, 01 – только ati, 02 – переключаемая.